I don't know about anyone else, but a majority of the work in my classroom takes place in an online environment. It is possible to do marking through Google Classroom, but it isn't always the most effective system. Enter Goobric and Doctopus. The best way to explain it is to walk through an example of what exactly these programs do. I have used it for the past few assignments I have done with students, and it has really streamlined the process!
Step One: Assign students a writing (or any other) assignment through Google Classroom. Name it something practical and descriptive so it is easy to find!
Step Two: Type up your rubric in Google Sheets

When you do this, it is important that you put your numbers along the top (and leave A1) blank, and put your criteria down the left-hand side.
Step Three: Open up a new (Blank) Google Sheets document.
I usually name it whatever the project name is and then add assessment at the end. This is where all your marks will be compiled

Step Four: In your newly created document, you will need to run the add-on Doctopus.
- If you don't have it already, you can go to the add-ons tab, and go to get add-ons, and search for Doctopus.
- If you have the add-on, you will need to launch it.

Step Five: Use Doctopus to ingest your assignment and select rubric
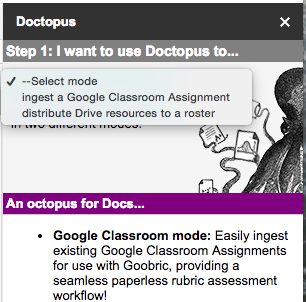 |
Step 1: Select "Ingest a Google Classroom Assignment" |
 |
| Step Two: Select your class from classroom |
 |
Step Three: Choose your Assignment |
Once you have your class and assignment chosen, you will pick your rubric
 |
| Click on "Attach Goobric" |
 |
| Select your rubric from Google Drive. Must be in Sheets! |
Step Six: Make sure you have the Goobric Extension (You only need to do this step the first time you do this)
Go to the Google Chrome Web Store, and search for Goobric. Or you can just click on this link to go Goobric Extension. The icon looks like this, and will appear with your other extensions


Click on the first assignment to open it up. Once you have it open, you must click on your Goobric extension. It will open up the same student document in a new tab
Step Eight: Assess student writing/work and give feedback
When your students work opens up through Goobric, it will look like the image below. You simply click on the rubric description that fits their work to select it. You can add comments into the comment box, and you can also attach a voice comment using the microphone button. When you are done, you can click submit. It will automatically move you onto the next assignment.

Step Nine: Check out your assessment data
If you go back to that new document you created all the way back in step three, all of your students' rubric scores and comments will be compiled there for you to view and print. The rubric scores and comments automatically attach themselves to the end of the students' assignment.

Thanks for sharing Jennine, it looks like a bit of work the first time, but seems like it would be pretty easy after that.
ReplyDelete